This is the documentation for the HAIRDINI and HAIRDINI HELPER HOUDINI HDA tools.
For the Substance Designer Hairdini Material Documentation, please click HERE.
For the Hairdini Unreal Engine Shader Setup Guide, please click HERE.
GETTING STARTED
The Hairdini HDA asset is available at Gumroad. It comes with TWO HDAs: The main "Hairdini HDA" tool that creates hair cards from Houdini hair curves and the "Hairdini Helper" tool, which automatically prepares multiple Hairdini nodes for export.
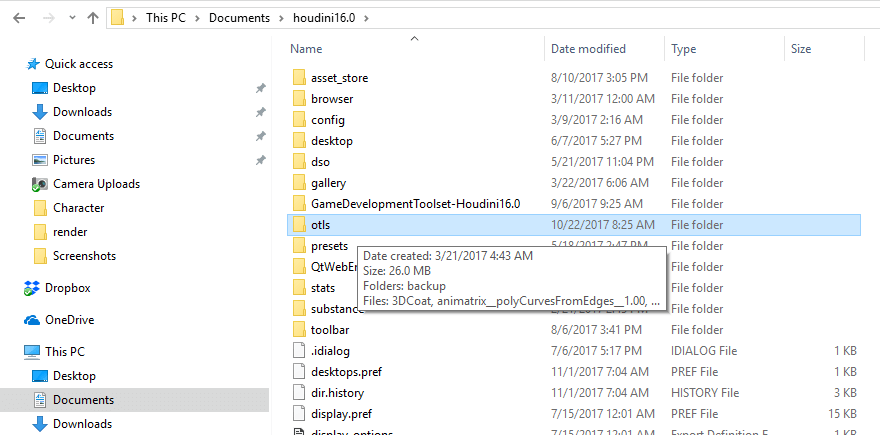
After you've downloaded the package, put the Hairdini HDAs into your OTLS folder, which is usually found under Documents>Houdini 19.0>otls.
HAIRDINI HDA (The Main Node)
The node will have TWO INPUTS. In the FIRST INPUT, put in your HAIR CURVES from Houdini. Ideally, you will want 1 Hairdini node PER HAIR OBJECT. Generally hair is separated by parts, such as bangs, top hair, side hair, facial hair, back hair etc. So you should have a Hairdini node for bangs, a separate one for top hair, and another for side hair, etc.
Sure, you could try to fit in a full scalp in one input, but you'll lose flexibility, accuracy, and have a messier hair card wig. You'll also be forced to have a high poly count to make up the difference. For instance, top hair generally needs more polygons than side hair, but you'll be forced to have a high poly count for side hair if you only use 1 solo Hairdini node. For optimal poly counts and shape accuracy, again, each hair group should have its own Hairdini node.
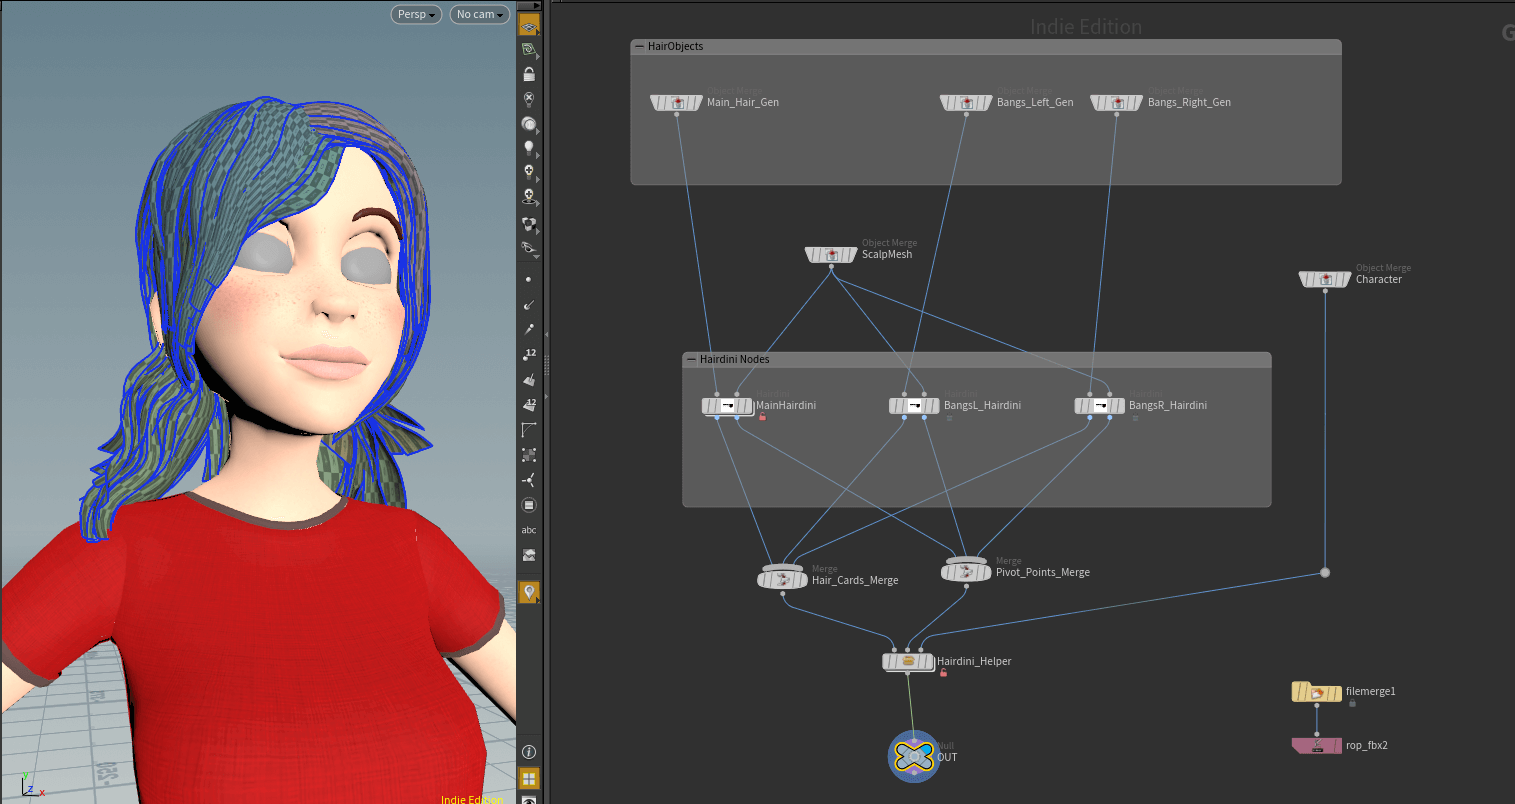
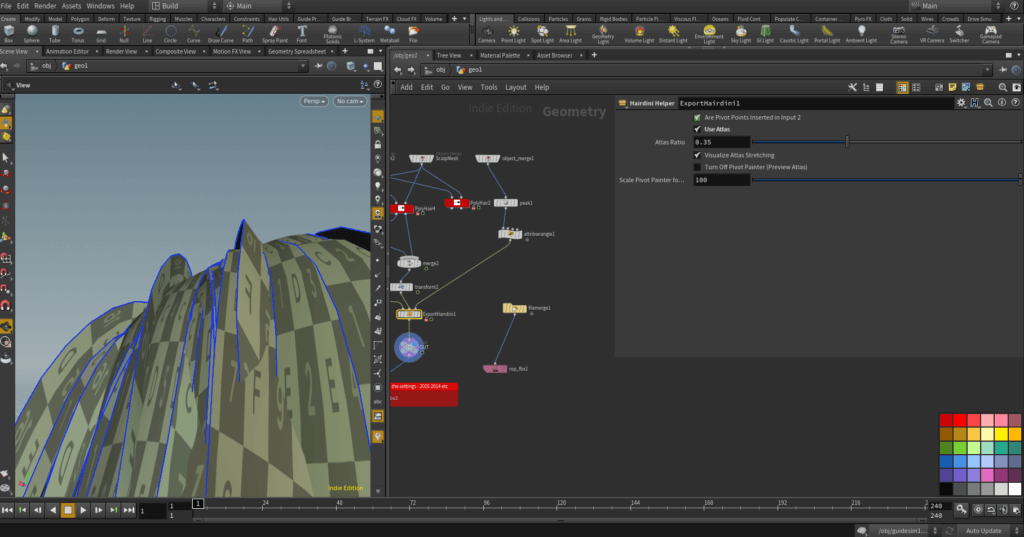
Sample Hairdini Graph. Notice each hair part has its own Hairdini node. They all feed into Hairdini Helper. The character's scalp mesh goes into Hairdini's second input. The merged Pivot Painter points go from the 2nd output of Hairdini into the 2nd input of Hairdini Helper.
In the SECOND INPUT, put in your character's mesh. IDEALLY, you may want to MAKE A GROUP for just your character's head for better collision. More details about this are in the parameter notes below.
PREVIEW MODE
The Hairdini asset can take a brief moment to process. If it's taking too long, check Isolate Hair Card. This will isolate a single hair card. Then, you can fine tune the size and shape instantly. This is a must if you want to make a custom clump curve, which is explained later on.
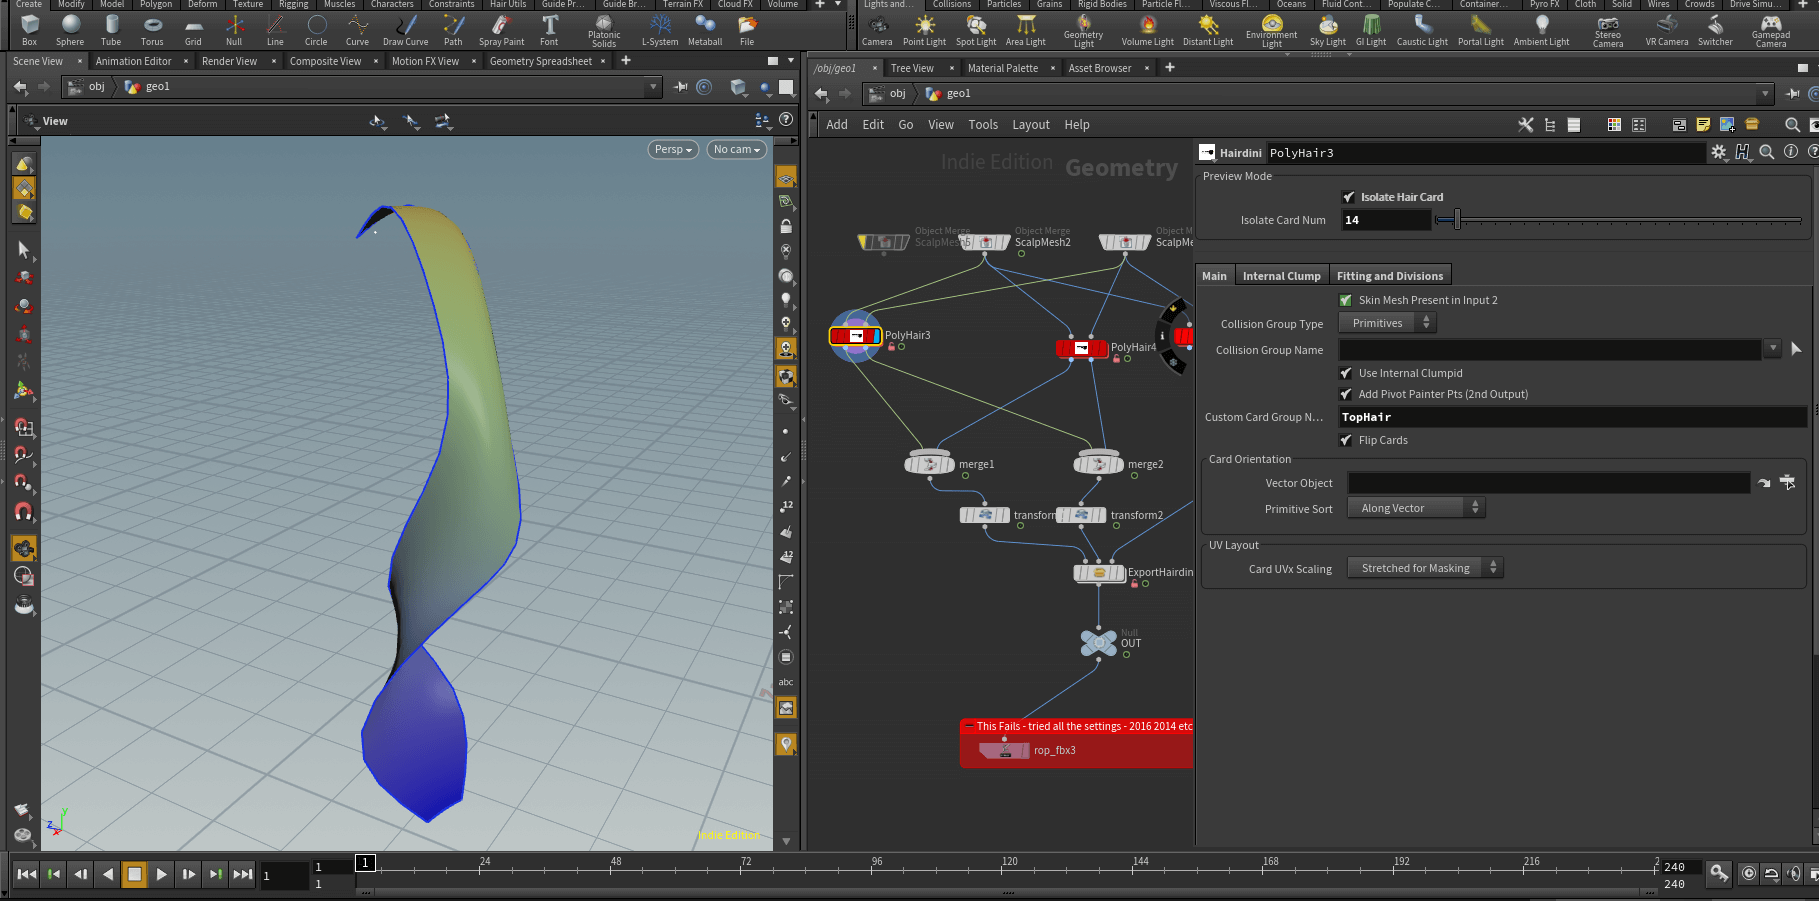
Click Isolate Hair Card for a quicker preview. A MUST for custom clump profiles and curling, explained later on.
The Isolate Card Number slider allows you to select which hair card you're previewing, so you can cycle through each hair card, one by one.
Below the Preview Mode parameter, you'll see three tabs: Main, Internal Clump, and Fitting and Divisions. PLEASE NOTE: Internal Clump will not be active until your character's mesh is hooked up into the 2nd input.
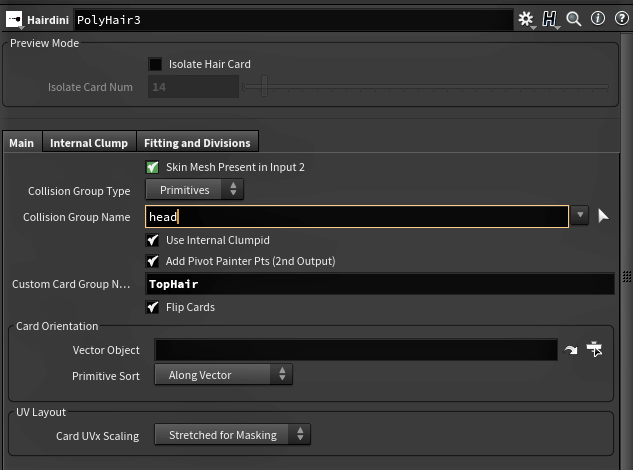
MAIN TAB
Skin Mesh Present in Input 2: This is not a user selectable parameter. It's looking for your character mesh in input 2. It serves as a reminder to insert your character's base mesh in input 2. If no mesh is present, the Internal Clump tab will not be active.
Collision Group Type and Collision Group Name: Input the custom group name you've made in your character mesh that you'd like to use as a collision detection. This way you can isolate only that portion, so hair cards don't interact with a character's clothing or accessories, only the head and shoulders. Set if this group is point or primitive based in the Group Type tab.
Use Internal Clumpid: This is a VERY IMPORTANT parameter. The Hairdini asset REQUIRES a "clumpid" attribute in order to work. The clumpid attribute is generated by a hair clump node when you model hair in Houdini. By default, unfortunately, SideFX erases the clumpid attribute as of the 16.5 update. This meant, under my previous Hair Card Asset, that you'd have to go into your Hair Clump node's attribute tab and re-enable the clumpid attribute. Then you'd have to go back and forth from the Hair Clump node's parameters, to the hair card asset's parameters...mildly annoying to say the least.
So in order to alleviate those problems, I've added an optional Hair Clump node within the HDA, which is activated when Use Internal Clumpid is checked. This way you do NOT have to go back and forth from your hair clump node to the hair card asset. Nor do you have to dig into a required pre-existing Hair Clump node to reactivate the clumpid attribute. It's now ALL BUILT IN.
Use Internal Clumpid NEEDS a mesh present in the 2nd input, or else it will be deactivated by default. Turn it off if you want to use the settings of your own hair clump node. You can adjust the Internal Clump's parameters in, you've guessed it, the Internal Clump tab. However, we'll get to that later. Let's finish going over the rest of the Main Tab.
Add Pivot Painter Points: This adds Pivot Painter Points to the base of each hair card and sets up naming attributes to match each Pivot Painter Point to its corresponding hair card. If you're unfamiliar with Pivot Painter, it's a new node within Houdini meant for game engines. It will allow you to animate your hair cards in Unreal Engine using data baked into the vertex colors and spare UV sets. Pivot Painter Points are in the 2nd OUTPUT in the Hairdini asset. You'll need to have installed the Game Development Shelf from SideFX to get Pivot Painter. Check out the video below from SideFX:
Custom Card Group Name: You'll generally need a Hairdini node per section of hair: one for the top of the head, one for the sides, one for the back of the head, one for any facial hair, etc. Insert a corresponding group name such has "TopHair" or "SideHair" or "EpicBeard". This way you can organize your Houdini node graph and isolate your hair cards more easily once you've merged everything. This group name is also used for the Pivot Painter Points feature to accurately name its points to the corresponding hair cards. So it's suggested to give each of your Hairdini nodes a unique Custom Card Group Name, so Pivot Painter won't potentially become confused. It won't, because there's safe guards, but it's best practice to give each hair card group a custom name.
Flip Cards: Sometimes hair is so wavy and topsy turvy that it can curl the normals right along with it. Use this to flip the cards in the proper direction if this happens. It's not a huge deal as hair cards need to be double sided, but it will get annoying if you need to preview your Hairdini asset in OpenGL that doesn't do double sides.
Card Orientation: Select the primitive sort option to create the splines of your hair card. What this does is it sorts each hair strand per clumpid by an attribute, such as an axis direction, normal direction, or vector. It gets the first and last of those hair strands, which are always edge hairs, then skins them. Along Vector is the default mode. Along vector has a big improvement from my prior hair card asset: It now has a custom vector built in, based off the average normal from the scalp for that particular hair clump. Use the drop down menu to pick through other options such as sorting by X,Y, or Z axis. Spatial Locality and Proximity to Point often give decent results. Proximity to Point pretty much produces a cross tangent of Along Vector: Along Vector will have the flat side of the hair cards conform to the scalp, while Proximity to Point will look like blades at roughly a 90 degree angle to the Along Vector version. If you have a high poly budget, you could make an Along Vector version, copy the Hairdini node, then switch the copy to Proximity to Point. Then increase the Proximity to Point version's Hair Clump Size attribute (explained below) to get a stray hair look.
Along Vector Hair cards (flat against the scalp) vs. Proximity to Point Hair Cards (cross tangent to the scalp). Mix in a few Proximity to Point hair cards for a stray hair look and to add “profile depth” if you have a high poly budget.
If you're savvy, you can also use your own expressions, or base the hair edge finding off an attribute. But 99.99 percent of the time, just leave it alone to the default "Along Vector". It really is the most reliable. The Vector Object parameter above "Along Vector" allows you to input an object and your edge hairs will be based off the angle of that object's location relative to your hair. It's not really ideal most of the time, but there if needed.
UV Layout: Each Card's UVx Scaling defaults to "Stretched for Masking". This means the hair card's UV height and width is fit to the range of 0-1 space, to take up the whole UV layout. This is because the Hairdini Substance Material has Edge Masking to feather the edges so the hair cards don't appear to be polygonal strips. You would adjust the Hairdini Substance Material's width to compensate for any stretching in lieu of the game engine's built in tiling to avoid having the edge mask tile.
Having UVs with this method is what makes procedural hair cards possible. You get a tiled material with feathered edges using the Hairdini Substance. The barely noticeable stretching actually looks more natural and helps break up the procedural pattern. If you have multiple Hairdini nodes and one of them is stretched or compressed too much in relation to the other hair sections, you could create a texture atlas to compensate. The second node included in this package, "Hairdini Helper", will do this for you, but we'll get to that later. The Hairdini Substance has an option to feather the edges of a 2 section texture atlas to go along with the Hairdini Helper's texture atlas creation. Read more about it in the Hairdini Substance documentation as well as in the Hairdini Helper section, later on in this page.
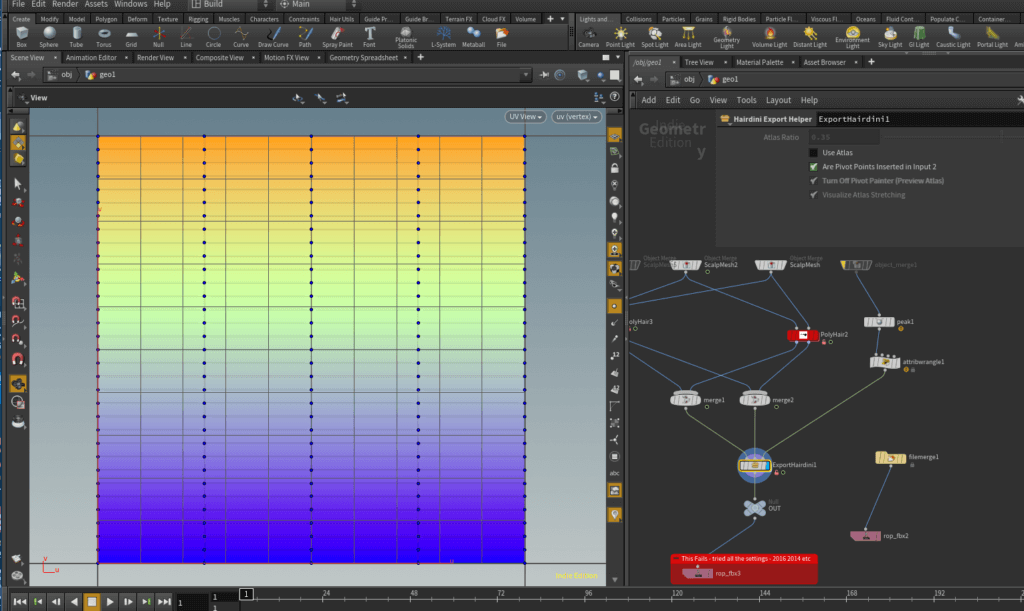
"Stretched for Masking" UVs WITHOUT a texture atlas option from Hairdini Helper (explained below). This is the default setting. Notice the cards are all uniform and take up full 0-1 UVx and UVy space, overlapping. This is to take advantage of the Hairdini Substance Material's EDGE MASKING feature. Don't worry about overlapping, we'll discuss that later, as there's a light map option with the Hairdini Helper node, explained below.
This is an edge mask created using the Hairdini Substance Material. This takes advantage of the Hairdini UVs being in 0-1 space. NO HAIR CARD is left looking like a polygon. They all have feathered edges, REGARDLESS of size or shape.
If you don't like "Stretched for Masking", there is also a "UVx Scaled" option. This has proportional UVx widths in relation to each card's size, while normalizing the UVy in 0-1 space to still take advantage of the Root and Tip masks in the Hairdini Substance. Side Edge masking is gone as a result of not having the cards take up the full 0-1 UVx space, however. The good news is it's not really noticeable and can be covered up within a game engine shader.

UVx Scaled setting's UVs. The card's UVx values are scaled to be proportional to the height. The cards are in a strip based row and reset to start at UVx 0 when the strip of hair cards passes the UVx 1.0 mark to keep a single UDIM tile. For the record, having multiple UDIMs to avoid overlapping was very slow as there can be a few dozen of them. You can always make a light map if you choose this option with Hairdini Helper, explained below. Just don't use a texture atlas with this option with Hairdini Helper. I suggest using Stretched for Masking as it takes advantage of both Root and Tip as well as Side edge masking via the Hairdini Substance Material. UVx Scaled only can take advantage of the Root and Tip masking, leaving hard side edges. The UVx Scaled option is mainly here for the UV distortion perfectionists that don't mind hard side edges and plan on doctoring up a material to hide them in a game engine. The asset was built mainly with "Stretched for Masking" as the default in mind.[/caption]
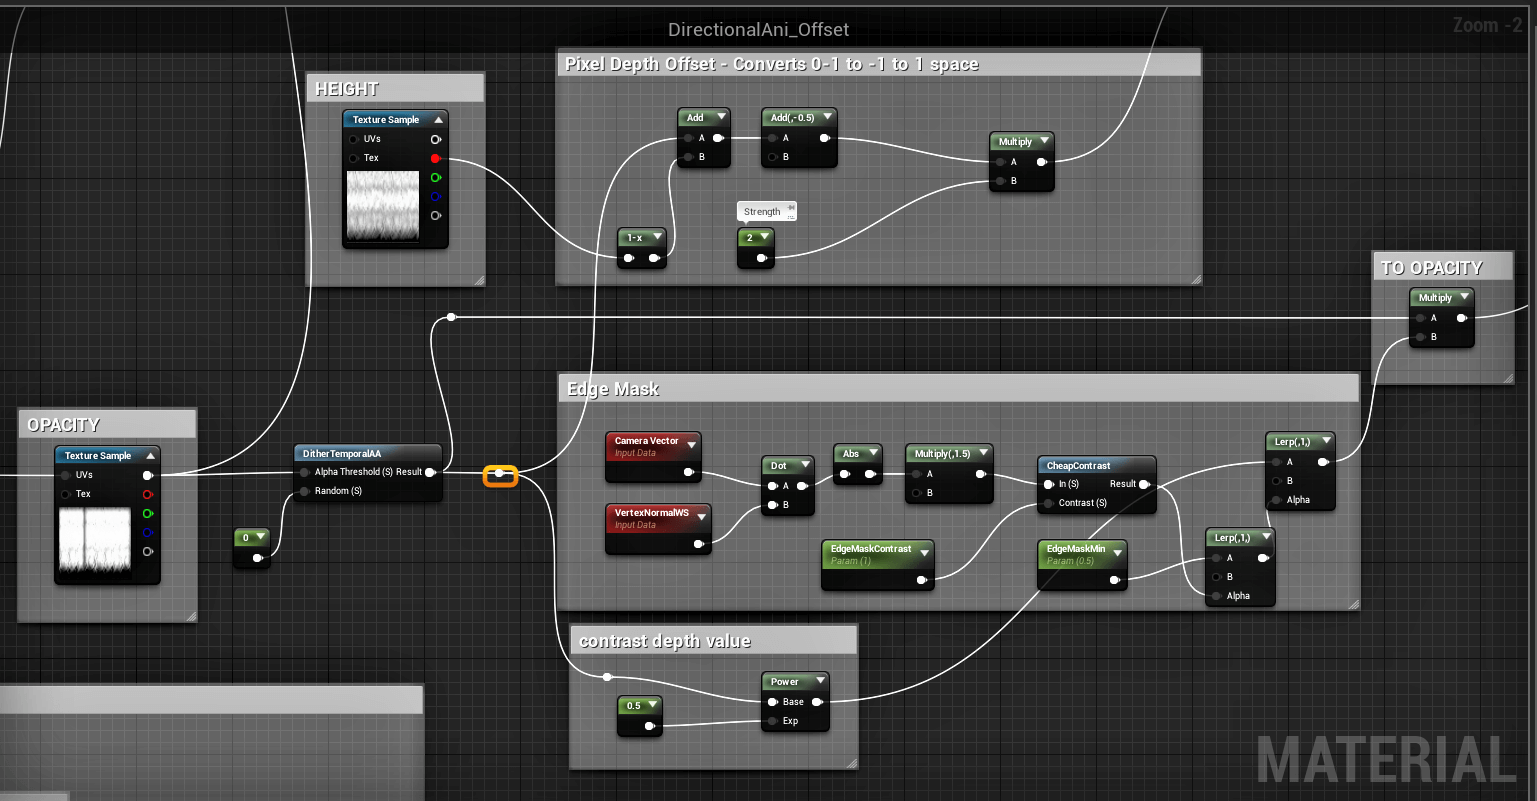
Unreal Engine can feather the side edges of each card by using a dot product of the viewing angle in conjunction with Pixel Depth Offset. While this sounds complex if you're new to Unreal, the blueprints can merely be copied from Unreal's Photo Realistic Character tutorial file. Or copy the pic below.
NOTE: Since the hair cards overlap to take advantage of the procedural Hairdini Substance Material, we'll need a non-overlapping UV set for a light map for game engines. This is taken care for you in the "Hairdini Helper" node, explained below. Or you can add a light map manually or just let your game engine create a light map. Keep in mind, if you use Pivot Painter, Pivot Painter needs uv1, uv2, and uv3, so don't add the light map to those values. Also, do not add your own custom light map to uv4 or uv5. Those are used by the Hairdini asset for comb map data (explained further down). Instead, set any custom light maps to uv6 or beyond. But it's not necessary to do that as the Hairdini Helper asset will take care of that for you.
If you manually add a Pivot Painter node, the Pivot Painter node will erase any spare UV sets you have, not including uv0, so don't worry, you won't use your uv layout. So if you want to set up Pivot Painter manually, after your Pivot Painter node, plug in a Vertex Wrangle. Input 1 of the wrangle will take the output of the Pivot Painter node. Input 2 of the wrangle will need a plug in from the Hairdini HDA node, before the Pivot Painter node is applied to fetch the uv4-6 data. Within the Vertex Wrangle, type in the following vex code:
v@uv4 = vertex(1, "uv4", @vtxnum);
v@uv5 = vertex(1, "uv5", @vtxnum);
v@uv6 = vertex(1, "uv6", @vtxnum);
This will re-add the comb map data from uv4 and uv5 and any light map data you put into uv6. Or, if you don't want to do this, or if I've completely lost you, don't worry. Again, merely use the Hairdini Helper HDA, the second HDA, which comes bundled with the package. Hairdini Helper will do all this automatically for you along with a few other features. Read more about Hairdini Helper below.
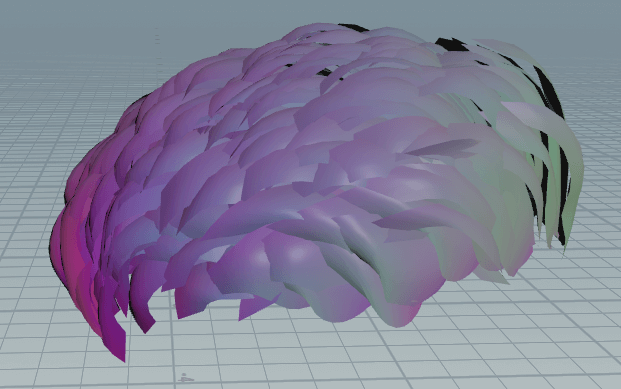
Comb Map ( Flow Map ) data from Hairdini that's encoded into UV4 and UV5. @Cd is set to = @uv4 to show this visually for this picture.[/caption]
The uv4 and uv5 UV sets include comb map data (flowmap) from your hair cards directional orientation, which is set up automatically with in the Hairdini HDA. Comb map data is stored in full as a vector 3 in uv4. The Z value of the comb vector for each vertex is also stored in the uv5.x value. This is because when you bring the model in Unreal Engine and try to read the comb map data via a Texture Coordinate node, the texture coordinate node can only read the first two components of the vector. It can't access the Z value of a UV vector, since UVs are two dimensional in nature, despite Houdini being able to store vector 3's within them. So if you need the Z flow data, also get a Texture Coordinate node for uv5 and pull out from the X value to get the Z flow data if you need it.
See the picture below for a sample graph. RIGHT CLICK the image and select OPEN IMAGE IN NEW TAB to get a bigger view. NOTE: The append nodes, while seemingly unnecessary, are because Unreal's Texture Coordinates are vector 2s vs. a vector 4 from the Comb Map from substance.
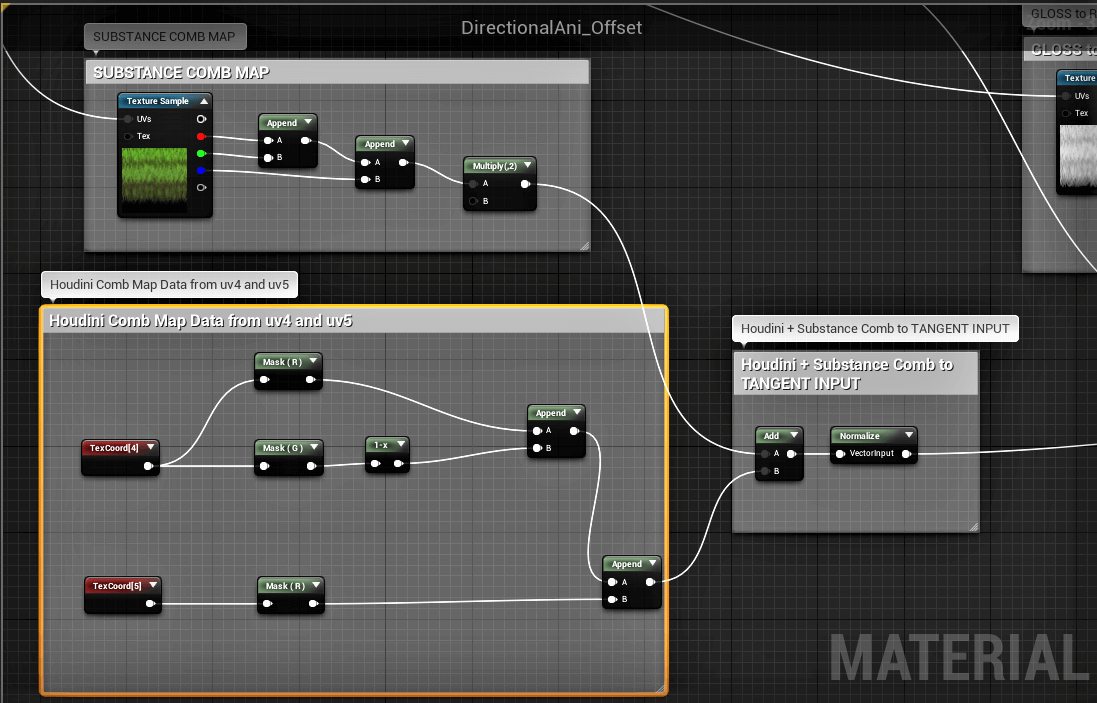
Example Blue Print in Unreal Engine getting the Comb Map data from Houdini on the bottom and from the Hairdini Substance, on the top. Add the two together, then normalize to mix them together. This way you get data from the actual curves from Houdini that the Substance graph doesn't have access to and you'll get individual strand comb data that Houdini doesn't have access to. The output goes into the TANGENT INPUT of the Hair Shader material in Unreal. Select a regular Material input node that ends each Unreal Material and click on it. Make it a "Hair" shader, then scroll down to change the Normal to "Tangent".
INTERNAL CLUMP TAB
Hair Card Size: I suggest sizes in the .02 to the .04 size range, depending on your needs. This determines your hair clump size, which in turn, determines how wide your hair card size is. Really small values may thin your hair too much and create a thinning bald look, on top of having a higher poly count. Bigger values will have less poly's and tend to cover the scalp more, but may be too big to precisely match the contours of the head and not have enough resolution to accurately depict your hairstyle.
Crossover Rate: This is a trial and error parameter. What this does is, in laymen terms, is it will "borrow" hairs from other clumps. This, of course, will make your hair cards bigger, as the amount of available hairs and area to borrow those hairs from increases as you push this value up. You will want to do this as some hair clumps are just too small to make a decent looking card, especially around tight spots, such as the ears. Push this value up slowly until you get a look you like.
Preserve Length Differences: When this is toggled ON, the edge hairs will retain their original length. When this is OFF, the edge hairs will converge towards the center in order to clump. Leave this off if you want to taper your hair using the Tightness or Clump Profile parameters (explained below). Or you could leave it on, but leaving Preserve Length Differences ON will counter act some of your tapering made with Tightness or Clump Profile.
Blend: This blends all the values from the built in Hair Clump node with your original hair style. Full value at 1.0 gives you exactly the parameters you've selected in the Internal Clump tab. If you set the Blend value to 0 and you do not have a pre-existing Hair Clump node in your Houdini Hairgen graph, then you won't see any hair cards because there's no clumpid attribute. Luckily, you can't do that. I have a minimum set to just above 0, so it's fool proof. As you progress in the Blend value, the hair cards will inherit more of the shape you are setting within the built in Internal Clump. The lower the Blend value is, the more it takes on the pre-existing hair curve style set up by Guide Grooms and Hair Gen nodes.
Hair Width Scale: Determines how spread out the hairs are in each clump, which will make your hair cards wider. Keep in mind, you won't notice this doing much unless you set the Blend parameter to a decent amount.
Tightness: This makes the tips of the hairs in each clump...clump. Hair cards will become more tapered and pointy the higher this value is. Again, your Blend parameter needs to be at a healthy amount to see this take effect. Also Preserve Length Differences needs to be unchecked to have a full effect, otherwise Tightness's effect will be marginalized.
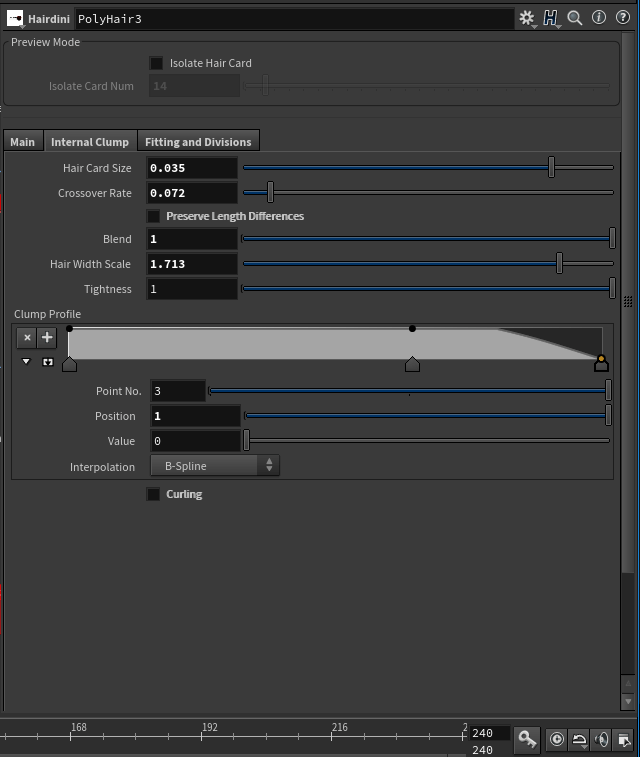
Clump Profile: This is a ramp value and the roots are on the left, the tips are on the right. Shape your hair card's thickness going from root to tip and even add curves if you wish. Again, the Blend parameter needs to be at a healthy amount to see this take effect. It also helps to have Preserve Length Differences OFF so they don't fight each other.
Curling: Toggle this on if you wish to add curling to your hair cards. BE CAREFUL! This may be too much and over stress the UVs on top of requiring a higher poly count. When Curling is toggled OFF, nothing is listed beneath it. When it's toggled ON, several curling parameters will appear below: Amplitude Amount, Amplitude Ramp, Frequency Amount, and a Frequency Ramp. These are self explanatory and the ramps act just like the Clump Profile ramp: You adjust the root Amplitude and Frequency on the left of the ramp and the tips are on the right side of the ramp. Use these to adjust how strong (Amplitude) or how many curls (Frequency) your hair cards will have. Again, Blend needs to be at a healthy amount to see this take full effect.
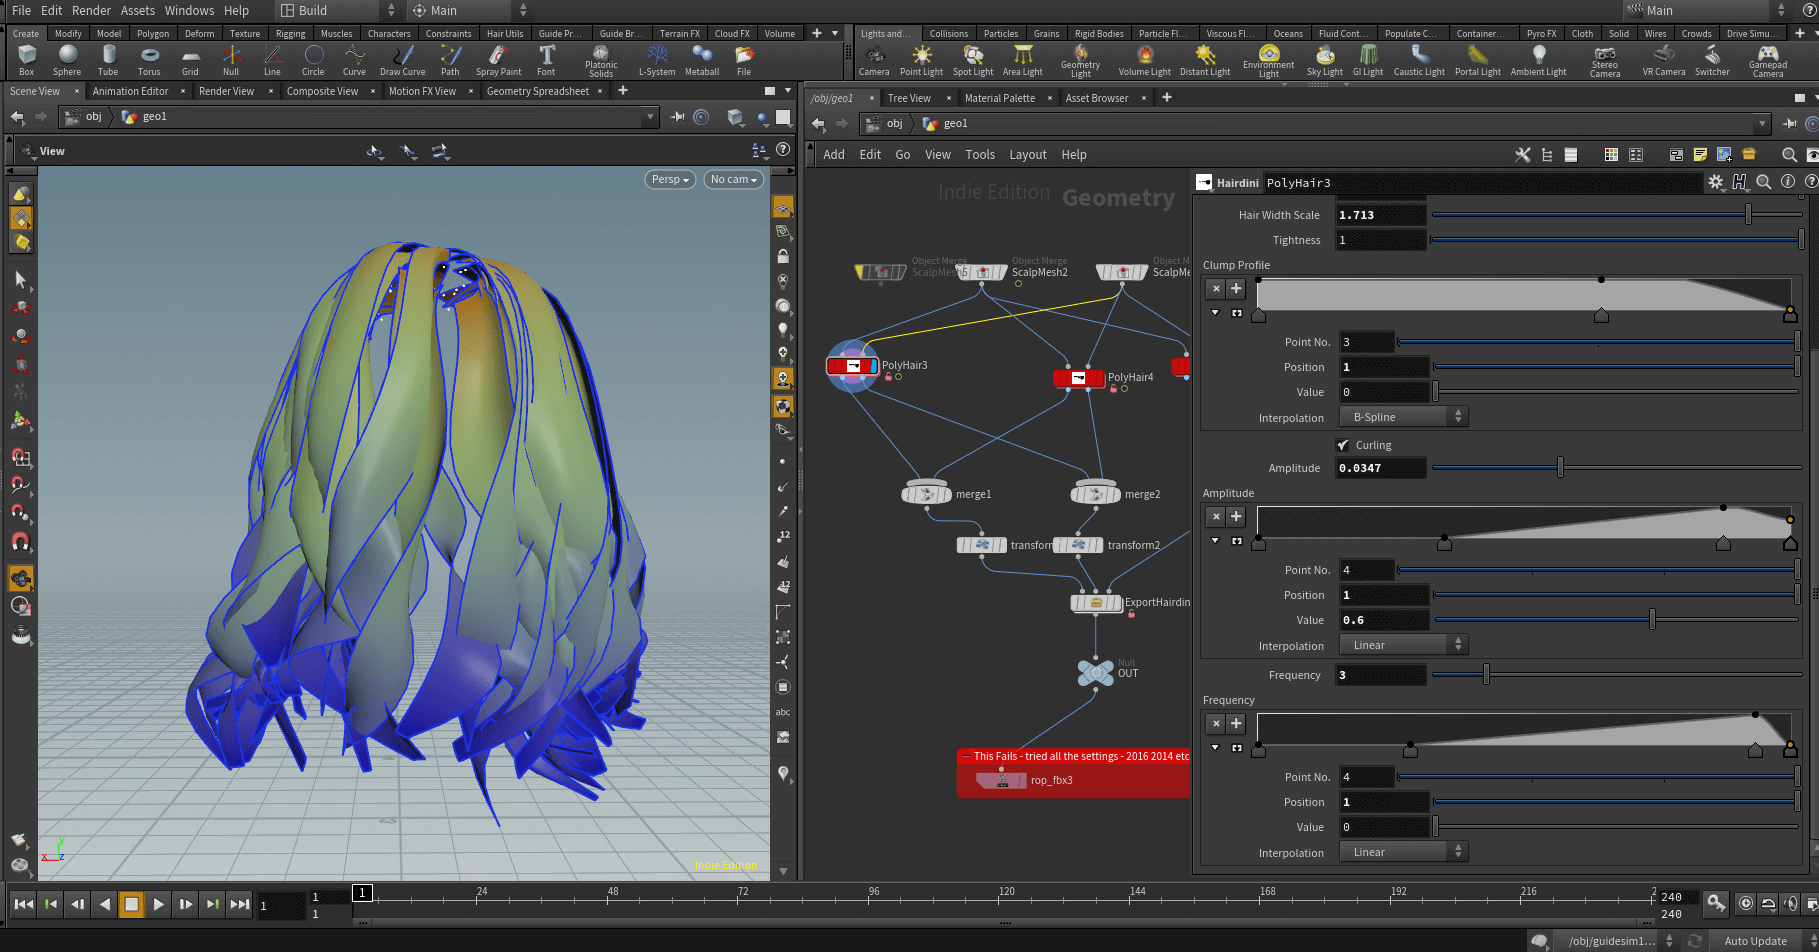
Turn on the Curling Parameter to unveil curling ramps.
NOTE: For Clump Profile and Curling parameters, it is suggested to turn ISOLATE HAIR CARD ON, under Preview Mode, listed on the top of the window. This way you'll get instant feedback and not wait for hundreds of hair cards to process.
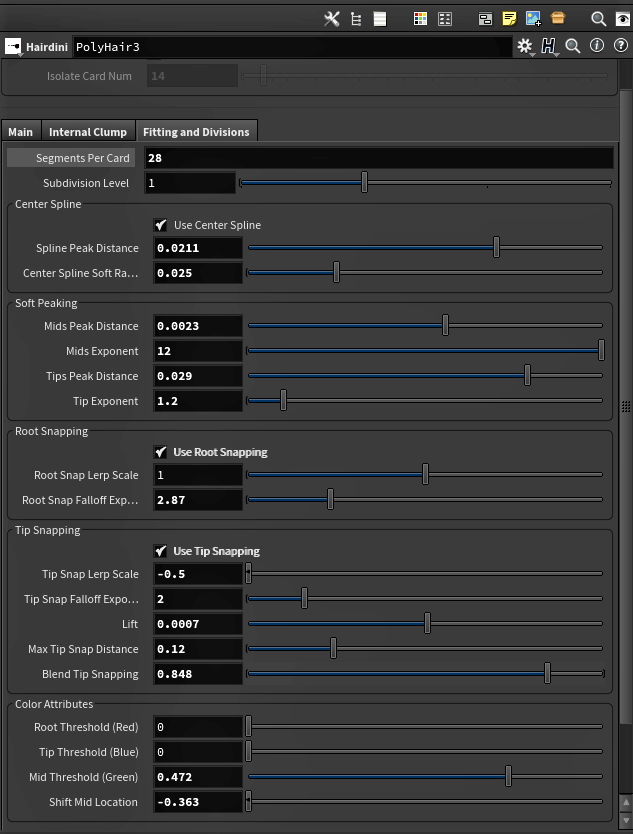
FITTING AND DIVISIONS TAB
Segments Per Card: This controls a Resample node within the asset. Choose how many segments you want each hair card to have for better fidelity. It's clamped to 4 segments as a minimum. Keep in mind you'll "increase your segments", in a sense, if you have the Subdivision Level (below) active at 1 or above. So you may want to decrease this value if you up the Subdivision Level.
Subdivision Level: This subdivides your entire hair card. While similar to Segments Per Card, these are very different parameters. Segments Per Card only adjusts the spline of the hair, going from root to tip, whereas Subdivision Level will subdivide not only the spline, but the cross sections of the card as well, going side to side in addition to vertically down the strand. Also note, Segments Per Card doesn't necessarily upscale hair strands. Incoming hair strands may have more segments when you were creating the hair with Groom and Hair Gen nodes. So hair strands with 22 segments will get down scaled and simplified if you have Segments Per Card set to 8 for example.
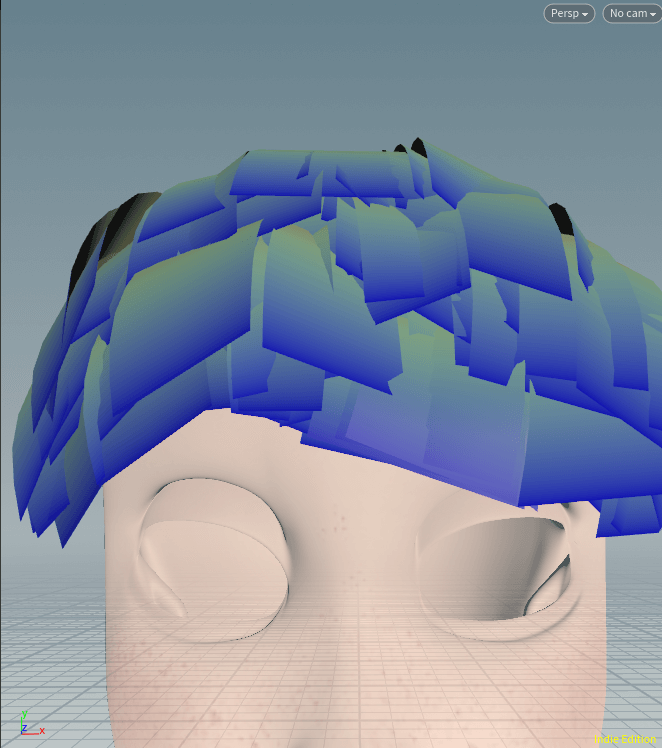
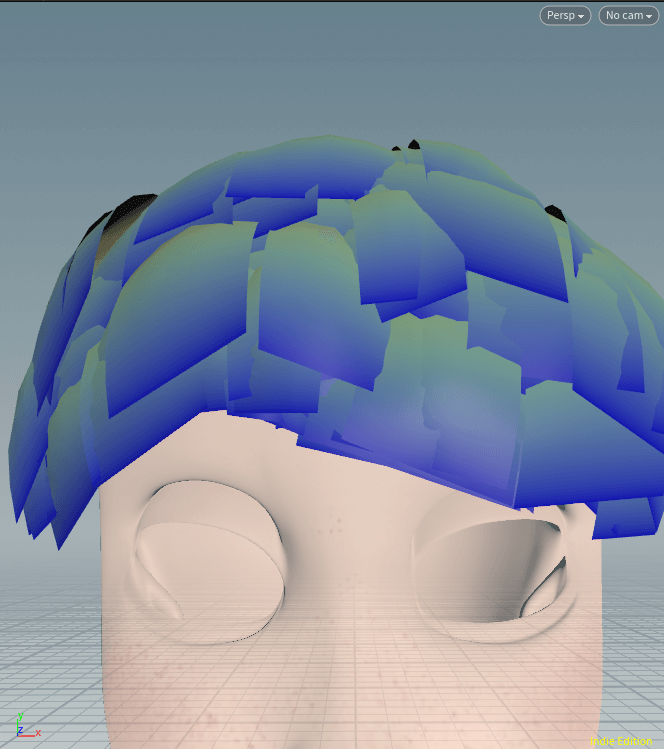
Center Spline: This allows you to "peak" or gradually raise the spline (center portion, lengthwise) of each hair card. This rounds the hair card and gives the appearance of a curved surface. This way the hair cards don't look like flat polygons. They'll appear as a rounded surface, going side to side, along the scalp. It does require more geometry, so if you're budget conscious with polygons, uncheck "Use Center Spline" to turn this option off. Spline Peak Distance determines how far the Center Spline gets raised. Center Spline Soft Radius determines how smoothly the Center Spline is raised. The raised Center Spline will appear like a sharp angle if Spline Soft Radius is off or set too low, or if your Subdivision Level is 0. Keep in mind, this works best with the default Along Vector "Card Orientation" parameter setting, since the hair cards will lay flat on, and conforming to, the scalp. You should turn this off most likely if you're using a Proximity to Point Hairdini node since the hair cards will be sideways, cross tangent to the scalp, and would thus bulge sideways.
See pictures below for BEFORE and AFTER of the Center Spline function:
Soft Peaking: Similar to Center Spline, Soft Peaking allows you to puff out and curve your hair along its normals. However this is going across the hair cards, not along it. Mids (middle portion of the hair cards, colored green) and the Tips (colored blue) both have a Peak Distance parameter (controlling how far the section is peaked out) and an Exponent parameter (controlling the falloff, with higher values being more sharp). These are based off the point colors of the hair card. You can adjust where the peak begins and ends by adjusting the colors in the Color Attributes section, down below. Likewise with Center Spline, you may have to turn this off for certain Card Orientation settings such as Proximity to Point.
Root and Tip Snapping: Snapping adheres the Roots or Tips to the character's mesh, so you must have one present in the 2nd input. Also, you should have a collision group set up in the "Collision Group Name" in the Main tab, so the Tips don't adhere to a jacket collar. Root and Tip Snapping have 3 similar parameters each: Use Snapping, Snap Lerp Scale, and Snap Falloff Exponent. Use Snapping is a toggle that turns snapping on and off, if you want a tiny bit more responsiveness from the asset. Snap Lerp Scale determines how far the Roots or Tips adhere towards the scalp mesh. Snap Falloff Exponent determines how sharp or gradual the shape is: lower values are more gradual and higher values are more sharp.
Because Tips are loose and move more freely than Roots (which are always anchored to the scalp), the Tip Snapping has a few extra parameters Root Snapping does not have: Lift, Max Tip Snap Distance, and Blend Tip Snapping. Lift merely offsets the collision point for fine tuning, but be careful, it's sensitive. Max Tip Snap Distance clamps how far the Tips can travel towards the scalp mesh. And Blend, obviously, blends your newly made shape with the original.
Color Attributes: The hair cards are color coded. The Roots are colored red. The Mids are colored green. The Tips are colored blue. This is for convenience if you wanted to make custom procedural adjustments, such as adding a sin($F) animation to @Cd.b to give the tips a slight animation, for example. It also helps mold the Soft Peaking and Root and Tip Snapping features, as mentioned above. You can adjust where the Soft Peaking (or Snapping) begins and ends by shifting the colors around to where you'd want Tip Peaking to start, for instance. Root Threshold moves the color red down the hair cards. Tip Threshold moves the color blue up towards the roots. Mid Threshold expands the green color if you want more or less Mid Soft Peaking. Shift Mid Location moves the green color up and down, to adjust where Mid Soft Peaking starts.
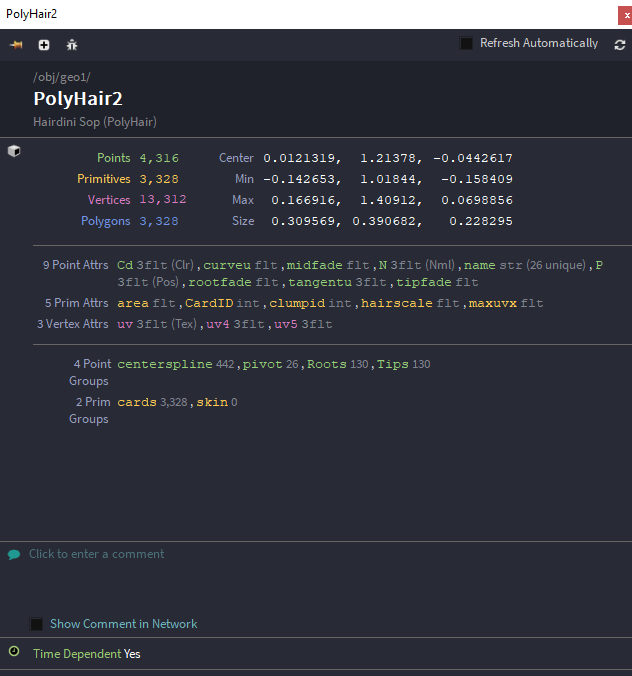
Houdini primitive attributes included in Hairdini: area, CardID, clumpid, hairscale, and maxuvx.
That concludes the parameters section. Note, if you middle mouse click the Hairdini node, you'll see a list of available primitive attributes you can use if you're vex savvy. I didn't delete a lot of them in case users wanted to experiment or do some post modeling of their own. You'll have an area attribute that I added to fetch the area of each card, which could be used for a number of things, such as pruning super small or large cards procedurally. The maxuvx attribute, discussed below, is used for the "UVx scaled" UV Layout option, but is still available if you've selected the default "Stretched for Masking" option. The maxuvx is merely what the UVx value of the UVs SHOULD be in relation to its scaled height, the UVy value. The hairscale attribute is how much the height, or UVy space, was scaled to get the UVy to fit in 0-1 space. For instance, if you have a hair card that's 2.5 units long and it's UVy value would normally be 2.5, then the hairscale value would read .4 as 1 is 40 percent of 2.5. The CardID attribute is the numerical value of each hair card produced. The clumpid attribute is a serial number Houdini assigns to hair clumps to identify them.
You don't really need to worry about all these attributes. I simply left them intact in case you wanted to experiment with them. Otherwise, feel free to delete them if you want to clean up your FBX before exporting.
Now let's cover the secondary HDA, "Hairdini Helper".
HAIRDINI HELPER (The Second HDA)
Hairdini Helper has THREE INPUTS.
In the FIRST INPUT, put your MERGED Hairdini nodes: Your Top Hair Hairdini cards, your Side Hair Hairdini Cards, your Epic Beard Hairdini cards, etc all go into a MERGE node, and that merge node goes into the first input.
In the SECOND INPUT, put your MERGED Hairdini Pivot Painter Points, which again are pulled from the SECOND OUTPUT from each of your Hairdini nodes, which go into a merge node, which goes into the second input.
In the THIRD INPUT, put in your character mesh.
What Hairdini Helper does is three things, most of which are automatic:
1. SETS UP PIVOT PAINTER: If you're using Pivot Painter, the Hairdini HDA (The Main Node from above) automatically sets up Pivot Painter Points with matching names for each hair card. The main Hairdini HDA node does NOT actually add the Pivot Painter node, it merely prepares points with a matching naming convention, as explained in the tutorial from SideFX above. The Hairdini Helper node is where Pivot Painter is added.
The issue is when you apply a Pivot Painter node manually, as explained above, Pivot Painter needs the uv1, uv2, and uv3 UV sets to store its information, ERASING any UV sets past uv0. It does not erase the actual UV layout however, stored in uv0. So we need to add uv4 and uv5 back, as well as uv6, which the Hairdini Helper node uses to store a light map from ALL your Hairdini objects combined. You'll see the code to add them back above, but Hairdini Helper does this AUTOMATICALLY, so you don't need to worry about re-coding in the uv4, uv5, and uv6 values back in. I merely mention the code and vex snippet above in case some people want to do things manually.
Pivot Painter also requires each object to be scaled by 100 to account for Unreal counting units as cms as opposed to meters. The Hairdini Helper node also takes care of that by scaling your Hairdini Wigs, Pivot Painter Points (from the Hairdini node's 2nd input), as well as the character mesh in input 3 by 100. This way it's fool proof. You can override the scaling if it's somehow an issue in the Scale Pivot Painter for Unreal parameter, explained below.
Keep in mind, you'll HAVE TO HAVE PIVOT PAINTER INSTALLED from SideFX. It's an easy process, so check out SideFX's website for more info, if you haven't installed the Game Development Toolset Shelf.
2. CREATES A TEXTURE ATLAS: Hairdini Helper has an option to create a texture atlas so you can partition hair cards by their width to improve UV distortion. This requires minimal input and is explained later on.
3. CREATES A LIGHT MAP: Hairdini Helper gets all of your Hairdini wigs and makes a light map and stores it in uv6, so you don't have to make one in game engine or make one manually. It's all automatic. Just tell Unreal Engine, or whichever engine you're using, to get the light map from uv index 6.
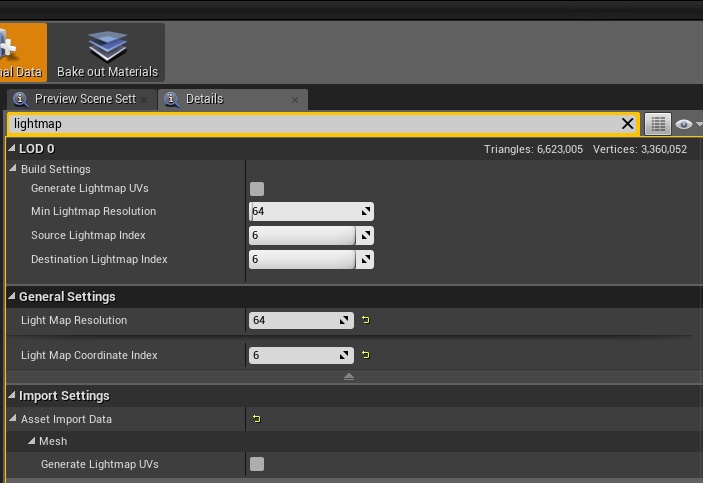
Double click on your Hairdini wigged character in Unreal Engine to open up the inspector. In the details tab's general settings, set the light map index to 6. Hairdini Helper will assign the light map to uv6. Let Unreal Engine know it's there.[/caption]
If you're using Unreal Engine, here's a REMINDER: Turn your Hairdini Character's lighting from "Static" to "Moveable". Otherwise, when you bake lighting, even if you tell Unreal about the light map in uv6, you'll get light map errors.
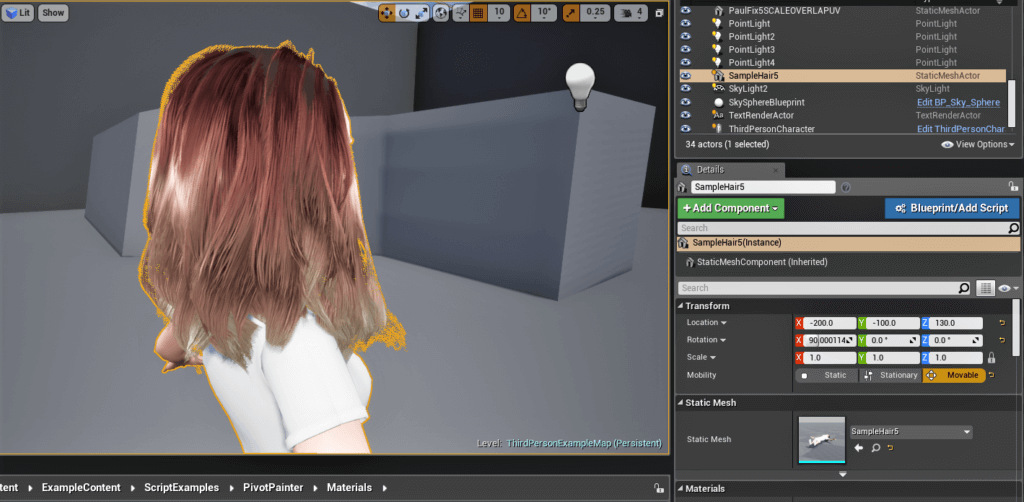
Make sure to click your character in the world outliner in Unreal Engine. In the Transform Tab, shown at the bottom right, under Mobility, select MOVEABLE. Otherwise your light map made by Hairdini Helper will not build properly.[/caption]
In case you have to ask, yes, Hairdini Helper NEEDS to be a separate node. Once again, you'll most likely have MULTIPLE Hairdini hair card wigs. They all need to talk to one another somehow to create a light map and texture atlas etc, so we need this one node to gather all of those Hairdini wigs into one place and trade info. It also saves you the trouble of manually uv'ing a light map and manually adding Pivot Painter nodes and re-adding the comb map data via vex.
Now let's cover the actual parameters:
Are Pivot Points Inserted in Input 2: This is not an interactive parameter. Like the "Skin Mesh Present in Input 2" parameter in the main Hairdini node, this acts as a reminder to input your MERGED Pivot Points into input 2. This also determines if the "Turn Off Pivot Painter" parameter below is active or not. You will NEED your MERGED Pivot Painter Points in input 2 in order to use Pivot Painter with Hairdini Helper.
Use Atlas: Hairdini hair cards can vary in width, especially considering that you'll most likely have several Hairdini objects for various parts of the hair. For instance, a "Top Hair" Hairdini node will generally be longer and thinner than a "Side Hair" Hairdini node, who's cards will tend to be shorter and wider, as side hair tends to be in relation to top hair in real life. Given that the Hairdini HDA asset fits the UV ranges, regardless of size, into 0-1 space, this may produce unwanted stretching and condensing in the UVs. If your hair cards aren't wonky and have similar clumpsizes you should be fine. The slight variation in UV stretching does help the procedural pattern look more natural. The stretching to fit both X and Y UV ranges into 0-1 is to take advantage of edge masks in the Hairdini Substance.
However, if the stretching bothers you, you have the option to "Use Atlas". This will divide your hair cards by size using a built in attribute called "maxuvx", located deep within the belly of the Hairdini HDA. This determines what the UVx value WOULD BE in relation to the "height" of the UVy space. Thinner cards will be PARTITIONED on the left hand side of the UV layout, and fatter cards will be partitioned on the right. Then the UVs of each partition get their UVx value scaled by a value of your choosing in the parameter below, "Atlas Ratio". You will then have to input the "Atlas Ratio" VALUE into the Atlas Ratio parameter in the Hairdini Substance when you bring your model into a game engine. The Hairdini Substance will then MASK each of the partitions, including the divider line. Even though the cards are no longer fitted to 0-1 UVx space, they still get an "edge mask".
Keep in mind, this is to help reduce texture distortion using the "STRETCHED FOR MASKING" option, so any Hairdini node input to a Hairdini Helper node that uses an atlas MUST BE SET TO "STRETCHED FOR MASKING" under the UV LAYOUT in the MAIN TAB, pictured above. Setting a node to "UVx Scaled" with a texture atlas is not only redundant, but will mess up the UVs.
Atlas Ratio: This determines how much you stretch or condense the two partitions. Again, the thinner cards are on the left and will have their UVx value decrease more in relation to the fatter cards to "stretch" the thinner cards more vs. the fatter cards. In other words, the UVs, in 0-1 space, for thinner cards, would normally look squished horizontally vs. the fatter cards which would look more normal. This mitigates the difference. The Atlas Ratio value determines the ratio of 0-1 space the thinner cards will take up, again, located on the left of the UV.
For example, let's say you set Atlas Ratio to .35. What happens is this:
1. The thinner cards, on the left, will have their UVx values go from 0-1 to 0-.35 instead.
2. The fatter cards, on the right, will have their UVx values go from 0-1 to .35 -1 instead.
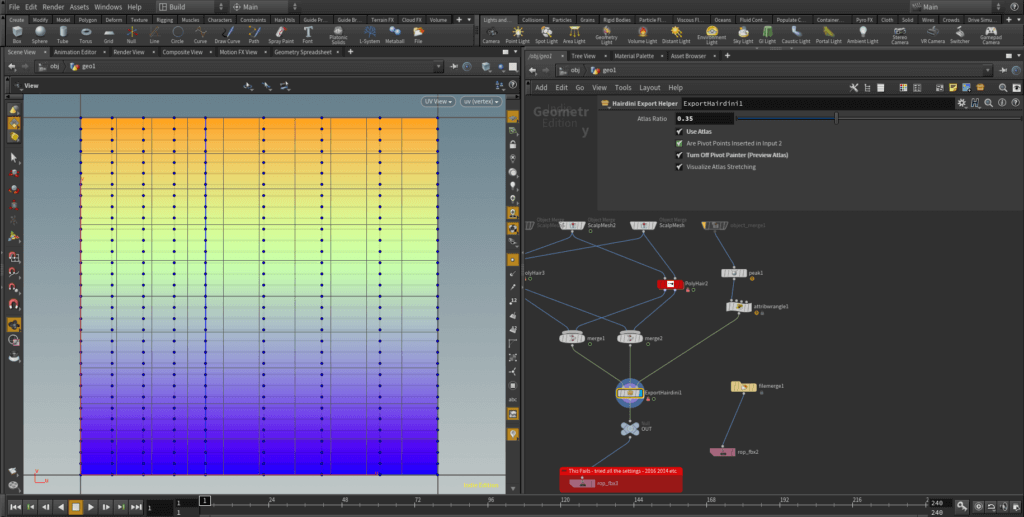
Hairdini Helper Texture Atlas with smaller cards, on the left, set to a ratio of .35. Notice the smaller cards have thinner UVx values than those on the right. Compare this to the normal UV Layout picture from above. Notice the BLUE DIVIDER line separating the partitions, and the shorter vertex interval on the left partition.[/caption]
REMEMBER the Atlas Ratio value. You'll need to input this value into the corresponding Atlas Ratio parameter in the Hairdini Substance, so you can have both partitions edge masked.
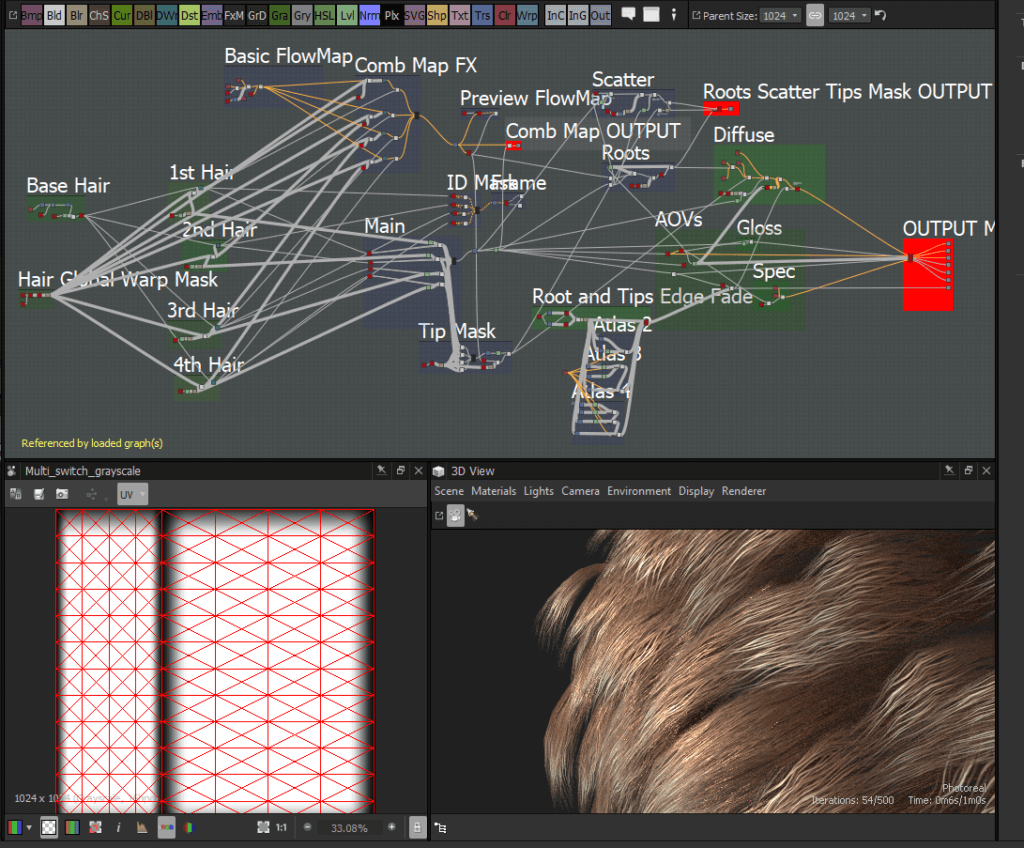
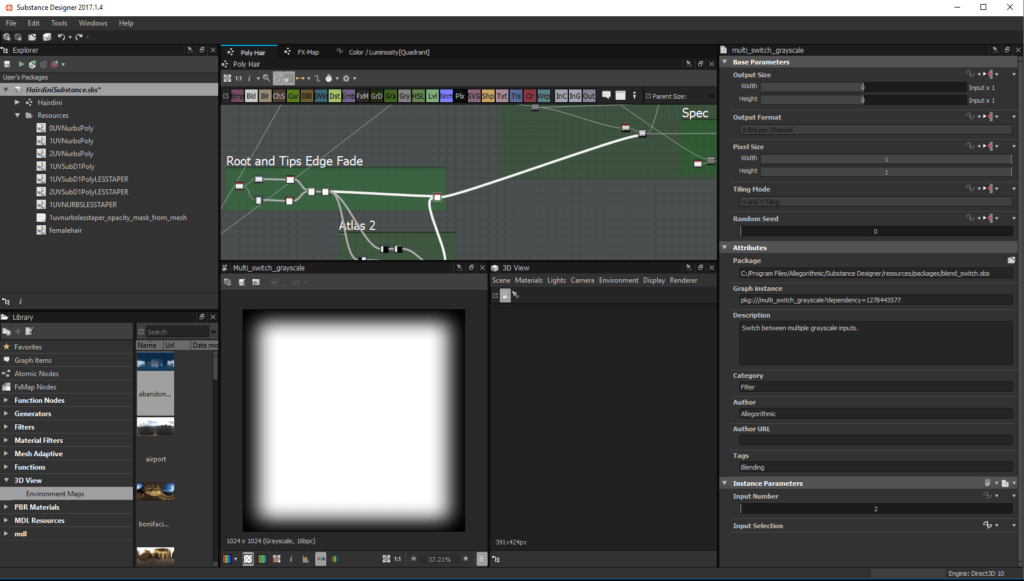
Texture atlas ratio set to .35 to match the .35 atlas ratio setting from Hairdini Helper. Set both parameters to match to get the Hairdini Substance material to split the edge mask where the divider line for each atlas partition is to edge mask the division line. Notice the UVs overlaid the new edge mask with a texture atlas.[/caption]
You can adjust the Atlas Ratio values left and right to get the look you want. If you are experiencing slow down, toggle "Turn Off Pivot Painter (Preview Atlas)" down below, which will speed up the graph to real time. By default, the Hairdini Helper's Pivot Painter is active and may slow down your machine a tiny bit.
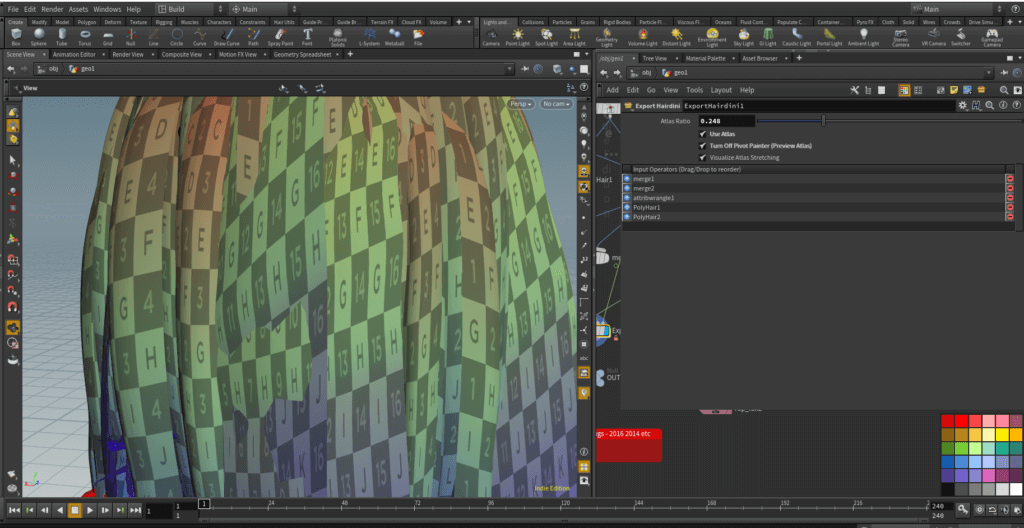
Visualize Atlas Stretching: This toggles on and off a UV Quickshade node for convenience. This way you get to see a UV grid on your texture atlas as you slide the Atlas Ratio value back and forth, trying to find a sweet spot.
See the BEFORE and AFTER pics below. The top pic is without an atlas, the bottom one has an atlas and has less stretching.

Turn Off Pivot Painter (Preview Atlas): As explained above, this toggles the Pivot Painter feature on and off. Turn it off if you're experiencing slow down while adjusting Atlas Ratio. REMEMBER TO TURN IT BACK ON before you export.
Scale Pivot Painter for Unreal: LEAVE THIS PARAMETER ALONE. It defaults to 100, as required for Pivot Painter. It's included in case you need to override the scaling for whatever reason, but 99.99 percent of the time, just leave it be. I'm including this just in case there's a game engine out there that uses Pivot Painter that does not need to be scaled or a situation arises where the scaling is not necessary.
PLEASE BE SURE TO CHECK OUT THE REST OF THE DOCUMENTATION:
The Hairdini Substance Designer Documenation
The Hairdini Unreal Engine Shader Setup Guide
